Showing posts with label Pinterest. Show all posts

Sunday, March 23, 2014

Spring Crafting and Decorating

In honor of spring, National Craft Month, and my March Goals, I had some fun last weekend!

I've had this little picket fence box for a year and decided it was time to give it a makeover. I wanted to make it classic white but also look authentic with some scuffs, crackles, etc.


After the first (dark) coat dries, then you apply the Martha Stewart crackle medium. I brushed it on more on the lighter side because the packaging said the heavier you put it on the bigger the cracks. Well, those fence posts are not that big so I didn't want the crackles to take over. If I could do it again, I would put more of the crackle medium on because I didn't get much of an effect.


Close up of the crackle. This one fence post is the only good one. The other side of the little planter didn't show ANY crackle. It's not as good as I hoped it would turn out, but it does look more rustic than if I had just done white.


Next craft task--I saw this tutorial for a pinwheel wreath and knew right away that I wanted to make it. Thanks to Sabrina at Neverland Nook for the easy-to-follow tutorial with pictures and directions. I've had my eye on this stack of yummylicious paper at JoAnn's for over a month now. I didn't have a specific use for it so kept telling myself not to buy it so it would just sit in my craft pile with so many other things that I haven't gotten around too. But then, Sabrina's pinwheel wreath tutorial provided the PERFECT reason to make this paper mine.

The lighting isn't the best for these pictures. It was nighttime when I was crafting so I had to use flash. But don't these papers just make you smile!?! I want this to be a fabric line so that when I have a little girl (someday) I can ask my mom to make a quilt out of this fabric!

According to her directions, first cut the paper into 5"x5" squares.

Then glue two different patterns together to make it double-sided.

I didn't take any pictures of making the pinwheels because I was having too much fun. The fact that I needed all my hands to hold the 4 corners may have been a factor as well. :) But Sabrina took pictures and gives great directions how to make the pinwheels so definitely go check out her blog.
Aren't they so fun and whimsical?

Here's the finished project!


I'm in love with it and so glad I made it!

After my crafting was complete, I got to putting it all together for my spring decor. I found the birdcage, frame, and key in the $1-$3 section at Michael's. The key came in a variety pack of 5. I made the blue jar 3 years ago and the wooden birch slice is from my wedding. You can find the spring subway art printable here.


Can you believe after living in our house for 9 months this canvas was the first thing we FINALLY hung on the walls last weekend. Good grief! My mom gave it to me when she was moving a year ago. It fits along perfectly with my latest bird obsession.

Not much on the calendar this month but the few items that are there are big: spring! March Madness! Ireland!

Then we were on a roll and decided to hang something else! I knew I wanted this canvas when I saw it at Hobby Lobby, but I had no idea where it would go that would be just perfect. Hubby held it against various walls so I could look and then he thought of this wall above our stairs. I love it there!

I think it fills the space so nicely and I get to see it multiple times a day!

The end of our bar needed a little spring lovin. I made the button cross last year when I was crafting and decorating for our spring mantel.

This year's spring mantle!


This nest basket (also from my mom) was perfect to go along with my birdie silhouette and some wooden eggs.

I followed some tips from Bird's Party Blog to give my wooden eggs a speckled effect.

I don't consider myself an artist by a long shot so I was pretty proud of myself when my chalkboard turned out this good! My inspiration was this pin whose source I cannot find but it may have been inspired by this chalkboard. I went with a mushroom instead of a bunny or chick because animals are definitely not something I can draw.

The last touch is this little bicycle I found at JoAnn's. I want to find a mini succulent to put in the holder but a candle will do for now.


Have you done anything crafty this month? Do you decorate for spring or only holidays?
Have you used the Martha Stewart crackle medium before? How did it work for you?

Sunday, March 2, 2014

Curtains--How to Choose?

In case you missed the First Step in our living room decorating, we have a new couch. I am loving it! It is so wonderfully comfortable and both hubby and I can stretch out as much as want for movie watching. When I walk in the door from work, I just smile when I see it. But, like with many things in life, gaining one thing just makes me want another. Now I'm not really confessing discontentment but just the natural decorating itch to take the next step. I've really been feeling that the next step for our living room is curtains. Curtains because I am craving some color and curtains because it is too dang cold to work in our garage to make a coffee table until...oh maybe July.

I have spent a couple hours this past week "researching" for curtain inspiration. This entailed lots of Pinterest and blog hopping. I found plenty of inspiration but still have no idea which fabric/curtain to choose!? However, I DID still accomplish my February Goal to narrow down my options. When you look through the pictures you may think it's not very narrow at all but trust me, there's a lot of great fabric I said "no" to.

Originally I had thought I wanted a multi-colored fabric to tie in all the decor ideas I have for this room. As I perused, I came across really only one multi-colored choice that I liked. I did some more thinking (mostly when I should have been sleeping) and decided that I want to go with just one color (or two if you consider color + white as multi). I am leaning towards a coral design. It's got to be the right coral though, not too orange and not too pink. This is subject to change of course. :)

So first, let's look at my main inspiration for living rooms and curtains.

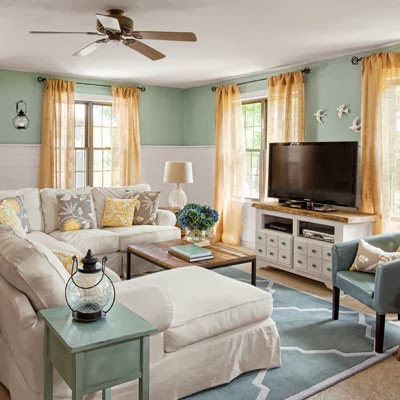
I am in love with this living room from "Four Generations One Roof". The light and airy feel, the rustic chic look and the cool color palette is exactly what I want. I love her TV console! We have an old dresser and I will be thinking of hers when we re-do ours. The lanterns and bird are such a fun touch and yet keep the room simple.
http://www.fourgenerationsoneroof.com/2012/02/family-room-before-after.html
 Yum! Jessica, I hope it's okay if I try to copy you! :) I really like her DIY burlap curtains, which you can read about how to make here. While, I don't think these curtains will work well in my living room, I may consider them for a room upstairs at some point.

Okay, inspiration living room #2 belongs to Abbie at "M is for Mama". This woman loves color and she knows how to use it! You can see more pictures of her beautiful living room here. I love reading Abbie's blog and I especially love seeing any of her home decorating and DIY projects.
http://misformama.net/2013/10/m-is-for-movement-a-living-room-tweaking-session.html
Her use of color, thrifty ways, and overall decorating style usually have me wishing she would come spend a month at my house and help me decorate. I plan to decorate using the same color as her: coral, blues and yellows. I even almost bought that "In This House" canvas from TJMax after seeing it on her blog. For some bizarre reason I decided to wait and when I went back a couple weeks later they were sold out. Learned my lesson there! I love the bird pillow and really all the different pillows coordinated together. I skimmed all the comments left on her blog post to find out where those curtains were from. She said they were called Volary from Fabric.com. I immediately opened a new tab and searched only to find out that this too was no longer available. So while some copying is out of the question here, I do hope to find a nice coral/white fabric and then some great colorful pillows to start adding the excitement that my living room so desperately needs.

 My third living room inspiration I originally found on Pinterest and then followed the link to the magazine website "House Beautiful". Once again, I love the light, airy feel and the splashes of multiple colors.
http://www.housebeautiful.com/decorating/house-pictures/vintage-colorful-beach-house-0911#slide-3


So those were the three living rooms that really inspired me. Now I have some curtains and fabrics that I love and just can't decide which route to go.

First are these somewhat striped coral curtains from Anthropoligie which I saw on Pinterest. But (insert heavy sigh) these also are no longer available. Probably just as well since I love them SO much I would have really struggled to bring myself to pay over $100 for one panel. But maybe they could have been on clearance! (another sigh)


So while they don't have the ones above anymore, they do have a few similar alternatives. I'm not in love with either one as much and the price tag is still a problem for me. But let's just look anyways, shall we?

These ones are called "Crochet Spliced Curtains" and have a crocheted type of stripe which I think is really cute and gives the whole stripe style a new sensation. However, when you compare it to the one above, I think this may be too far on the orange side of coral for me.
http://www.anthropologie.com/anthro/product/home-curtains-embroidered/26436824.jsp?cm_sp=Grid-_-26436824-_-Regular_34

The next is called "Swing Stripe Curtains." This one again has a fun style of stripe. They are little pom poms. I think its a creative idea but I'm not sure I love the 3Dish effect the curtains would have. Also, as they would be behind my couch, I would like to have the color be more dominant than the neutral tone to offset my couch and the white walls.
http://www.anthropologie.com/anthro/product/home-curtains-embroidered/25006891.jsp?cm_sp=Grid-_-25006891-_-Regular_9

These are totally not coral, but if I were going to make a major color shift, I think these would be it (well in a world where the price tag doesn't matter again). These are Pottery Barn's Classic Stripe Drapes in Porcelain Blue. I love how it can't really decide if it's green or blue and I think that would work well with my decor style where multiple shades of a color will appear together and (hopefully) not look weird. I do wish the neutral stripe was more tan than white though.
http://www.potterybarn.com/products/pb-classic-horizontal-stripe-pole-pocket-blackout-drape/?pkey=cview-all-curtains&cm_src=view-all-curtains||NoFacet-_-NoFacet-_--_-


***Insert totally unrelated curtains into the blog post about curtains for the living room. ***

I LOVE THESE!!!
(the bird ones, not the blue floral)
http://www.pier1.com/Applique-Birds-on-a-Wire-Curtain/PS41881,default,pd.html?cgid=curtain-length
I would not put Applique Birds on a Wire Curtain from Pier1 in my living room for a couple reasons, but their more reasonable price tag (still a little more than I would like to spend) and my absolute love of them is causing me to rack my brain for WHICH room I CAN put them in. I would not put them in my living room because as I said before, the neutral is too dominant to go right by my couch and white walls. Also, the couch would hide half the birdies and that would be so wrong! I am wondering and kinda hoping they could work over the slider in our dining room. It is on the same wall as the living room window and only separated by about 3 1/2 feet of wall but that distance from the couch might be enough. Plus, if I do get a colored curtain for the living room they would balance each other out. Or.....am I totally off track in design world and the curtains for both should be the exact same? Someone with more decor savvy please tell me! :)

I just looked online again and discovered that they are available at the store 5 minutes from my house. Yikes! I now have the urge to go buy them and hold them up in different rooms and make a decision before the return date. What do you think?


An entirely different route would be for me to buy some fabric and make my own curtains, which is going to be the cheapest route. It's just a matter, once again, of choosing.

Abbie at M is for Mama posted not too long ago about "27 Vibrant Home Decor Fabrics for Under $25/yard". As I was perusing Fabric.com, I realized that at one points or another, I had tabs open for 6 of her 12 fabrics here! Check out her blog to see more picks, find out what these are all called, and just to pay her a visit because she is so wonderful!
http://misformama.net/2014/01/27-vibrant-home-decor-fabrics-for-under-25yard.html


After a couple hours looking through pages and pages of home decor fabrics, here are my top picks! Some would be curtain options, some maybe for throw pillows or something else.
https://www.fabric.com/home-decor-fabric.aspx
1. Zig Zag Khaki 2. Gotcha Ocean 3. Suzani White/Coral 4. Vertical Ticking Stripe Ivory/Brown
5. Stripe Slub Salmon 6. Swavelle/Mill Creek Renette Floral Sundance 7. Lulu Stripe True Turquoise 8. Fynn Ocean 9. Claridge Dots Jacquard Tango Mango 10. Duralee Home Birdcage Canary

When I was still highly considering multi-colored curtains, #6 was high on the list. #10 also comes in coral and grey which are equally wonderful.

Here are my last top pics for fun coral prints!


This is called Poppies Coral by "Birch Organic Fabrics" in their line "Elk Grove Knits". The only problem is I don't think a knit would be a good fabric for curtains. Also, it's a little too pink for what I want.


This is Chevron Melon by "Dear Stella" in the "Mercer" line. That whole line is such a fun mix of navy and coral!

 This lovely fabric is Honey House Peach by designer Bonnie Christine in her line "Sweet as Honey."


The last one is Beekeeper Coral also by Bonnie Christine and also in the line "Sweet as Honey."


So many beautiful living rooms, curtains, and fabric! How is a girl to choose? Help me out! I'd appreciate any design advice or votes! 

Saturday, March 23, 2013

DIY Chevron Mug

How many of you have seen the Pinterest posts for making your own Sharpie mug? They're all over, right? But if you've searched enough, you also have seen people say it is a Pinterest Fail. The Sharpie is not dishwasher safe. Back in January, I had a hangout day with several of my girlfriends. I bought Dollar Store mugs for all of us and we used my Sharpies to design our own mugs. It was a lot of fun, but I warned them it might not be dishwasher safe. I have still not used or washed this mug yet so did not really know what would happen.

home is where the heart is: DIY Chevron Mug

On Friday, my teacher partner approached me with an idea for gifts for our reading switch teachers. She thought maybe the students in each group could decorate some sort of travel mug for their teacher. Then this idea popped into my head! I had seen this blog post about dishwasher safe Sharpie mugs, but had not had time to try it out yet. I told the other teacher about it and that I would test it this weekend before we had the students do it.

With that said, I left school and stopped by our new JoAnn's to get a Sharpie oil-based paint marker and then the Dollar Store to get a white mug. I used a 50% off coupon at JoAnn's so the marker cost $1.84 and the mug cost $1.06. This project cost $2.90!!!

Sharpie is not the only brand that makes these markers, but they were the best price. They sell them in extra fine, fine, medium, and bold tips. You can get individual markers or a pack of 5. I chose yellow although I was a little bit nervous that it would show up very well on the white mug. My skepticism comes from the regular Sharpie markers not being very bold on the mug.

I used a ruler to measure and cut 2inch strips of masking tape. I then cut each 2inch strip in half (vertically) so that I had two skinnier 2inch pieces. I started at the top of the mug and worked to overlap tape pieces in a chevron strip pattern. This definitely took some work, patience, and good eyeballing. I asked my husband several times if it looked right. My mug tapered which made it hard to keep the stripes the same going down the mug.

Once the mug was all taped off, it was time to paint! The directions on the marker say to take the cap off and depress the tip one time with your finger. Put the cap back on and shake to get the paint flowing. (Shake it with the tip down). Then press the tip down a few times on the surface to get the paint flowing steadily.

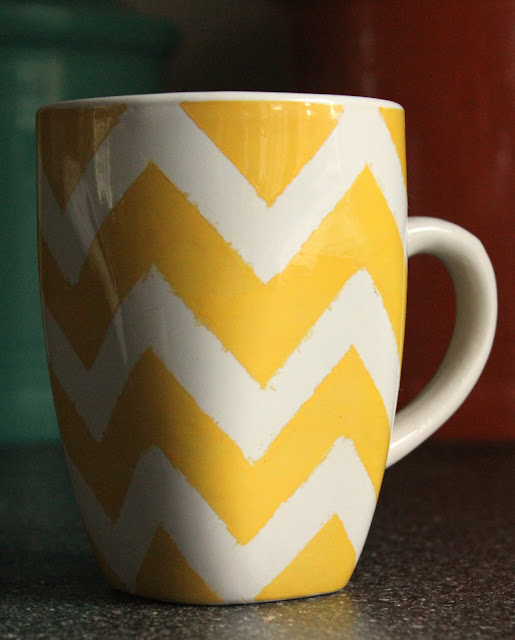
Here is my mug all painted. I decided to leave the handle white since that would have been really hard to do in the chevron (at least for me). You can't really tell in the picture, but you can somewhat see pen strokes. I found that if you pressed the tip down every so often, the paint would come out and spread better rather than look like a marker.

I let the mug dry for over an hour before taking the tape off.


There were several places where the paint had seeped under the tape and my stripes didn't have nice crisp edges. I dipped a q-tip in rubbing alcohol and "painted" it on top of the areas I wanted to "erase". I used the dry side of the q-tip to actually wipe the unwanted yellow off. This worked really well!

According to the blog post, the mug should go in the oven WHILE it preheats to 350. I put mine on a tray so that it wouldn't fall over. Once the oven reaches 350, set a timer for 30 minutes. After the 30 minutes, turn the oven off, but leave the mug in the oven while both cool down. I left the oven door cracked open a bit to help this part move along.

It came out looking great! I was so excited/proud of my work!
Finally it was the time for the dishwasher test. I grabbed my other Sharpie mug so that I could compare results.
Here are the mugs before the dishwasher.

And after.
NOTE: The before picture was taken at night so I did use flash. The after picture was taken this morning with natural light. The dishwasher did NOT change the shade of yellow on the Chevron mug, that is due to my light source. The dishwasher DID however fade away several of the polka dots from the regular Sharpies.

Conclusion: regular Sharpies are NOT dishwasher safe, but the paint Sharpies are!!!


You might see some bleeding of the yellow and think my edges aren't that crisp. That is NOT what it looked like when I finished with the rubbing alcohol. I'm not sure if the oven or dishwasher did that. It's a little bit fuzzy but I'm okay with it. I am still so excited and pleased with how it turned out! Also very happy that the yellow really contrasts with the white unlike the regular yellow Sharpie.


What do you think? Would you try this? If you do, let me know how it goes!

Thank you to Emily at Scribbles from Emily for the tutorial!

As you saw in my post earlier today, I did buy the pack for my students and I am excited about the cute mugs they will create for their reading teachers!

I've linked up at the following parties:
five days five ways | feature friday free for all
Here Comes the Sun

Photobucket


Keeping It Simple


More the Merrier Monday


        Positively Splendid