Showing posts with label crafts. Show all posts

Sunday, March 23, 2014

Spring Crafting and Decorating

In honor of spring, National Craft Month, and my March Goals, I had some fun last weekend!

I've had this little picket fence box for a year and decided it was time to give it a makeover. I wanted to make it classic white but also look authentic with some scuffs, crackles, etc.


After the first (dark) coat dries, then you apply the Martha Stewart crackle medium. I brushed it on more on the lighter side because the packaging said the heavier you put it on the bigger the cracks. Well, those fence posts are not that big so I didn't want the crackles to take over. If I could do it again, I would put more of the crackle medium on because I didn't get much of an effect.


Close up of the crackle. This one fence post is the only good one. The other side of the little planter didn't show ANY crackle. It's not as good as I hoped it would turn out, but it does look more rustic than if I had just done white.


Next craft task--I saw this tutorial for a pinwheel wreath and knew right away that I wanted to make it. Thanks to Sabrina at Neverland Nook for the easy-to-follow tutorial with pictures and directions. I've had my eye on this stack of yummylicious paper at JoAnn's for over a month now. I didn't have a specific use for it so kept telling myself not to buy it so it would just sit in my craft pile with so many other things that I haven't gotten around too. But then, Sabrina's pinwheel wreath tutorial provided the PERFECT reason to make this paper mine.

The lighting isn't the best for these pictures. It was nighttime when I was crafting so I had to use flash. But don't these papers just make you smile!?! I want this to be a fabric line so that when I have a little girl (someday) I can ask my mom to make a quilt out of this fabric!

According to her directions, first cut the paper into 5"x5" squares.

Then glue two different patterns together to make it double-sided.

I didn't take any pictures of making the pinwheels because I was having too much fun. The fact that I needed all my hands to hold the 4 corners may have been a factor as well. :) But Sabrina took pictures and gives great directions how to make the pinwheels so definitely go check out her blog.
Aren't they so fun and whimsical?

Here's the finished project!


I'm in love with it and so glad I made it!

After my crafting was complete, I got to putting it all together for my spring decor. I found the birdcage, frame, and key in the $1-$3 section at Michael's. The key came in a variety pack of 5. I made the blue jar 3 years ago and the wooden birch slice is from my wedding. You can find the spring subway art printable here.


Can you believe after living in our house for 9 months this canvas was the first thing we FINALLY hung on the walls last weekend. Good grief! My mom gave it to me when she was moving a year ago. It fits along perfectly with my latest bird obsession.

Not much on the calendar this month but the few items that are there are big: spring! March Madness! Ireland!

Then we were on a roll and decided to hang something else! I knew I wanted this canvas when I saw it at Hobby Lobby, but I had no idea where it would go that would be just perfect. Hubby held it against various walls so I could look and then he thought of this wall above our stairs. I love it there!

I think it fills the space so nicely and I get to see it multiple times a day!

The end of our bar needed a little spring lovin. I made the button cross last year when I was crafting and decorating for our spring mantel.

This year's spring mantle!


This nest basket (also from my mom) was perfect to go along with my birdie silhouette and some wooden eggs.

I followed some tips from Bird's Party Blog to give my wooden eggs a speckled effect.

I don't consider myself an artist by a long shot so I was pretty proud of myself when my chalkboard turned out this good! My inspiration was this pin whose source I cannot find but it may have been inspired by this chalkboard. I went with a mushroom instead of a bunny or chick because animals are definitely not something I can draw.

The last touch is this little bicycle I found at JoAnn's. I want to find a mini succulent to put in the holder but a candle will do for now.


Have you done anything crafty this month? Do you decorate for spring or only holidays?
Have you used the Martha Stewart crackle medium before? How did it work for you?

Saturday, March 1, 2014

March Goals

Happy March!

I am so excited for this month! First, because it is the month in which winter is NO more. I like all the seasons but winter just sticks around for waaaaay too long in these parts. And most likely even when it is officially spring, I am sure it will still look and feel like winter. But somehow, "the first day of spring" helps me mentally start getting over the freezing cold and never ending snow.

Second--this month ends with the start of spring break! Unfortunately that also means another set of report cards to get done. But this month, I will have loads of motivation! Two days after the quarter ends, we are headed to

 IRELAND!!!

Isn't that beautiful?!?!

Those are the Cliffs of Moher and I will be there!!! I am preparing myself to be wet and cold but taking tons of pictures and soaking up all the amazing landscapes. This will also be my first time to Europe so I'm pretty excited to add another continent (and country) to my (very short) list.

Here were my February goals:
1. Go to the gym 5 times
2. Read 2 books kinda
3. Blog 2 times
4. Cook 1 new recipe
5. Get my Project Life out of the closet and start working on it again
6. Narrow down an idea for the curtains for my living room

While basketball and report cards were not an issue this month, I had so many sick/absent students that it created lots of extra work for me to keep them on top of their work and then I got sick too and lost all energy and motivation to do anything. I did make it to the gym 5 times but my workouts were pretty mild as it would wipe me of all my energy. I finished 1 book and am currently reading 2 different books "Allegiant" by Veronica Roth and "Love Does" by Bob Goff so that kinds counts as read 2 books since I didn't say "finish". :) I blogged once and have another post 90% done but it just didn't get finished before March. I did cook something new and it was very yummy. I made Balsamic Glazed Lamb Chops. Thanks to Kayley at "The Kitchen McCabe" for the recipe. Sadly, I never did get my Project Life out. I planned to do it last night after Wyldlife but we decided to hang out with some friends and I'm glad we did. Depending on your definition of narrow, I have narrowed down my ideas for curtains. It's actually the blog post in progress so you will hear and see more about it soon! So not amazing but not terrible! And hey, in my defense....February shorted me by 2 days!

Here are my March Goals:
1. Go to the gym 6 times
2. Finish "Allegiant" and "Love Does"
3. Brush up on my photography skills and how to use my camera beyond Auto so that I can fully capture Ireland with awesome picutres
4. Get my Project Life out and start working on it again
5. Make a March Madness Bracket
6. Blog 2 times other than this post
7. Make 1 new recipe
8. Really narrow down curtain options and buy some--or the fabric to make some.
9. Do 1 crafty thing! March is National Craft Month and I feel like I should partake even if it's in a small way.
10. Decorate my house for spring!

Wow, way more goals than previously. But I'm feeling motivated and 80% of my lesson planning is already done for the next 6 weeks since I'll be out of the country for all of break and don't want to come home and write lesson plans. We'll see how I do!


Any tips for international travel? 
What to pack? (I HATE packing and tend to over-pack every trip) 
How to survive the looooong overnight flight? (I will NOT be watching the new movie "Nonstop" despite how much my husband wants to see it!)
Do you have any goals for this month?
Do you decorate your house for spring?
Do you watch March Madness at all?
Will you be crafting at all for National Craft Month?

Sunday, June 23, 2013

DIY Entryway Table Part 3

You probably thought I would never blog again. And even if I did come back, you probably thought I would never finish that darn entryway table. Well, if you did think those things--think again!

I am back and definitely sad that I have been away for so long. Teaching Kindergarten in the morning and math for 3rd and 4th graders in the afternoon as well as keeping a close eye on our house-in-progress left little time for blogging. But as with all school years, summer comes and there is more time!

We finished the table back in April during a weekend that tricked us into thinking summer weather was here to stay.

In case you forgot, here's a refresher of the not-so-pretty-looking table.You can look at Part 1 and Part 2 to see how we got this far.

 
 Close-up shot in case you thought from the other picture that it was "not too bad".

 Being my our first DIY wood-refinishing project, we just guessed our way through what to do. Yes, yes, I know there are so many how-to's and directions on Pinterest. But, when your husband suggests spur-of-the-moment to finish it since the weather is nice, it is better to just get up and go while's he's willing  to help rather than say, "hold on honey, first we need to do our Pinterest research." And I wasn't too concerned about doing it just right either because again, this table is our funky little creation that we don't intend to keep forever (although we quite possibly might).

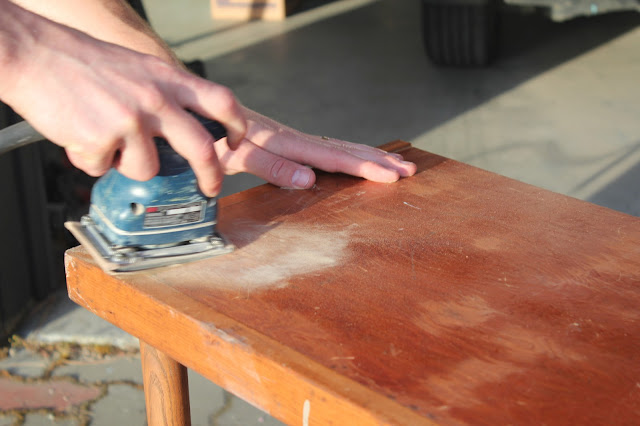
So at any rate, we could tell there was some sort of varnish on it and figured we should probably sand the table. Did I get that one right? At least partial credit? 

 The little hand sander wasn't going to get the job done like we wanted so we pulled out the belt sander.

 After getting it all de-varnished and smoothed down, it was time to paint! You can tell by the pictures (in case my own admittance isn't enough) that we are total amateurs...we didn't even own a paint stick so used an actual stick. 

I like painting things! I'm no artist by any means but give me a piece of wood and one color and I can get it covered for ya! I am so eager to try a wall (or two or three) in our house eventually despite hubby's unrelenting insistence that painting is "not that fun." Hmmm...maybe he's right but I want to find out for myself.

 There she is! We let it dry overnight and put a second coat on the next day. Since I got the paint from Re-Store, I'm not sure what the color is called, but I'm calling it Iced Mint. What do you think? Should I apply for a job to name paint colors or OPI nail polish? Maybe not. But either way, I'm so happy with how our first little project turned out! Now this summer I need to spend some time reading those Pinterest directions so that next time I am prepared.

And I just realized as I was putting pictures up that I totally neglected to take any pictures of the table back in the house with the cute May decor on it. Unfortunately I can't take a picture right now either because we are moving in one week (YAY!!!) so all the decor stuff is packed away. Once we are in the new house and this little Iced Mint table is re-decorated, I will post a picture and then the story will truly be over!

Check back later this week for pictures of our finished house! :)

What was your first DIY wood-finishing project? Did it turn out like you hoped?

I've linked up at the following parties:

More the Merrier Monday
Keeping It Simple


Embracing Change

five days five ways | feature friday free for all

 The Girl Creative


DIY Show Off

Saturday, March 23, 2013

DIY Chevron Mug

How many of you have seen the Pinterest posts for making your own Sharpie mug? They're all over, right? But if you've searched enough, you also have seen people say it is a Pinterest Fail. The Sharpie is not dishwasher safe. Back in January, I had a hangout day with several of my girlfriends. I bought Dollar Store mugs for all of us and we used my Sharpies to design our own mugs. It was a lot of fun, but I warned them it might not be dishwasher safe. I have still not used or washed this mug yet so did not really know what would happen.

home is where the heart is: DIY Chevron Mug

On Friday, my teacher partner approached me with an idea for gifts for our reading switch teachers. She thought maybe the students in each group could decorate some sort of travel mug for their teacher. Then this idea popped into my head! I had seen this blog post about dishwasher safe Sharpie mugs, but had not had time to try it out yet. I told the other teacher about it and that I would test it this weekend before we had the students do it.

With that said, I left school and stopped by our new JoAnn's to get a Sharpie oil-based paint marker and then the Dollar Store to get a white mug. I used a 50% off coupon at JoAnn's so the marker cost $1.84 and the mug cost $1.06. This project cost $2.90!!!

Sharpie is not the only brand that makes these markers, but they were the best price. They sell them in extra fine, fine, medium, and bold tips. You can get individual markers or a pack of 5. I chose yellow although I was a little bit nervous that it would show up very well on the white mug. My skepticism comes from the regular Sharpie markers not being very bold on the mug.

I used a ruler to measure and cut 2inch strips of masking tape. I then cut each 2inch strip in half (vertically) so that I had two skinnier 2inch pieces. I started at the top of the mug and worked to overlap tape pieces in a chevron strip pattern. This definitely took some work, patience, and good eyeballing. I asked my husband several times if it looked right. My mug tapered which made it hard to keep the stripes the same going down the mug.

Once the mug was all taped off, it was time to paint! The directions on the marker say to take the cap off and depress the tip one time with your finger. Put the cap back on and shake to get the paint flowing. (Shake it with the tip down). Then press the tip down a few times on the surface to get the paint flowing steadily.

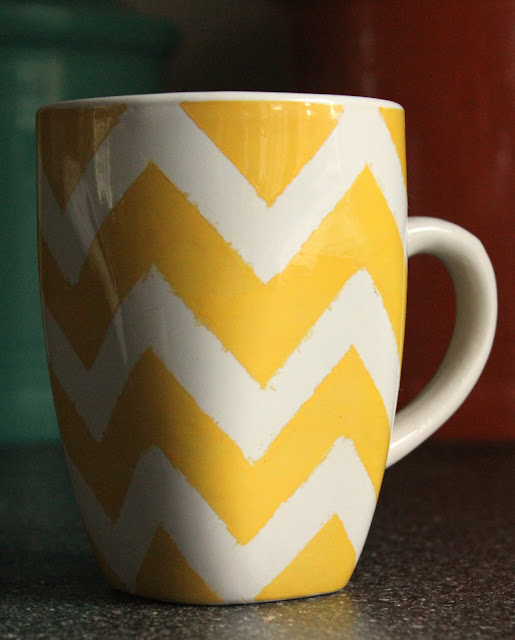
Here is my mug all painted. I decided to leave the handle white since that would have been really hard to do in the chevron (at least for me). You can't really tell in the picture, but you can somewhat see pen strokes. I found that if you pressed the tip down every so often, the paint would come out and spread better rather than look like a marker.

I let the mug dry for over an hour before taking the tape off.


There were several places where the paint had seeped under the tape and my stripes didn't have nice crisp edges. I dipped a q-tip in rubbing alcohol and "painted" it on top of the areas I wanted to "erase". I used the dry side of the q-tip to actually wipe the unwanted yellow off. This worked really well!

According to the blog post, the mug should go in the oven WHILE it preheats to 350. I put mine on a tray so that it wouldn't fall over. Once the oven reaches 350, set a timer for 30 minutes. After the 30 minutes, turn the oven off, but leave the mug in the oven while both cool down. I left the oven door cracked open a bit to help this part move along.

It came out looking great! I was so excited/proud of my work!
Finally it was the time for the dishwasher test. I grabbed my other Sharpie mug so that I could compare results.
Here are the mugs before the dishwasher.

And after.
NOTE: The before picture was taken at night so I did use flash. The after picture was taken this morning with natural light. The dishwasher did NOT change the shade of yellow on the Chevron mug, that is due to my light source. The dishwasher DID however fade away several of the polka dots from the regular Sharpies.

Conclusion: regular Sharpies are NOT dishwasher safe, but the paint Sharpies are!!!


You might see some bleeding of the yellow and think my edges aren't that crisp. That is NOT what it looked like when I finished with the rubbing alcohol. I'm not sure if the oven or dishwasher did that. It's a little bit fuzzy but I'm okay with it. I am still so excited and pleased with how it turned out! Also very happy that the yellow really contrasts with the white unlike the regular yellow Sharpie.


What do you think? Would you try this? If you do, let me know how it goes!

Thank you to Emily at Scribbles from Emily for the tutorial!

As you saw in my post earlier today, I did buy the pack for my students and I am excited about the cute mugs they will create for their reading teachers!

I've linked up at the following parties:
five days five ways | feature friday free for all
Here Comes the Sun

Photobucket


Keeping It Simple


More the Merrier Monday


        Positively Splendid