On Friday, my teacher partner approached me with an idea for gifts for our reading switch teachers. She thought maybe the students in each group could decorate some sort of travel mug for their teacher. Then this idea popped into my head! I had seen this blog post about dishwasher safe Sharpie mugs, but had not had time to try it out yet. I told the other teacher about it and that I would test it this weekend before we had the students do it.
With that said, I left school and stopped by our new JoAnn's to get a Sharpie oil-based paint marker and then the Dollar Store to get a white mug. I used a 50% off coupon at JoAnn's so the marker cost $1.84 and the mug cost $1.06. This project cost $2.90!!!
Sharpie is not the only brand that makes these markers, but they were the best price. They sell them in extra fine, fine, medium, and bold tips. You can get individual markers or a pack of 5. I chose yellow although I was a little bit nervous that it would show up very well on the white mug. My skepticism comes from the regular Sharpie markers not being very bold on the mug.
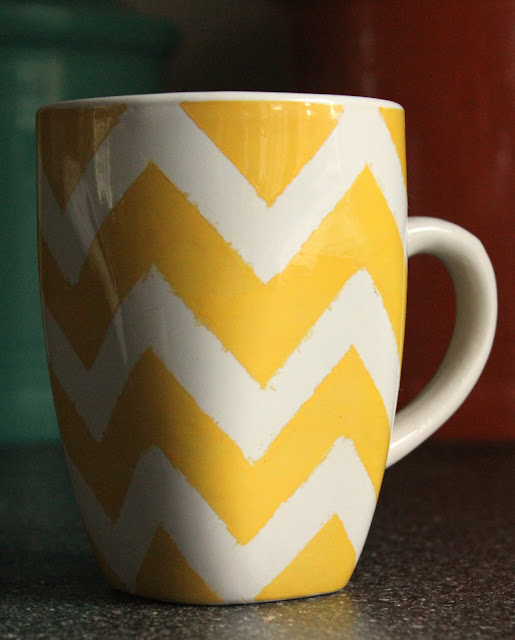
I used a ruler to measure and cut 2inch strips of masking tape. I then cut each 2inch strip in half (vertically) so that I had two skinnier 2inch pieces. I started at the top of the mug and worked to overlap tape pieces in a chevron strip pattern. This definitely took some work, patience, and good eyeballing. I asked my husband several times if it looked right. My mug tapered which made it hard to keep the stripes the same going down the mug.
Once the mug was all taped off, it was time to paint! The directions on the marker say to take the cap off and depress the tip one time with your finger. Put the cap back on and shake to get the paint flowing. (Shake it with the tip down). Then press the tip down a few times on the surface to get the paint flowing steadily.
I let the mug dry for over an hour before taking the tape off.
There were several places where the paint had seeped under the tape and my stripes didn't have nice crisp edges. I dipped a q-tip in rubbing alcohol and "painted" it on top of the areas I wanted to "erase". I used the dry side of the q-tip to actually wipe the unwanted yellow off. This worked really well!
According to the blog post, the mug should go in the oven WHILE it preheats to 350. I put mine on a tray so that it wouldn't fall over. Once the oven reaches 350, set a timer for 30 minutes. After the 30 minutes, turn the oven off, but leave the mug in the oven while both cool down. I left the oven door cracked open a bit to help this part move along.
It came out looking great! I was so excited/proud of my work!
Finally it was the time for the dishwasher test. I grabbed my other Sharpie mug so that I could compare results.
Here are the mugs before the dishwasher.
And after.
NOTE: The before picture was taken at night so I did use flash. The after picture was taken this morning with natural light. The dishwasher did NOT change the shade of yellow on the Chevron mug, that is due to my light source. The dishwasher DID however fade away several of the polka dots from the regular Sharpies.
Conclusion: regular Sharpies are NOT dishwasher safe, but the paint Sharpies are!!!
You might see some bleeding of the yellow and think my edges aren't that crisp. That is NOT what it looked like when I finished with the rubbing alcohol. I'm not sure if the oven or dishwasher did that. It's a little bit fuzzy but I'm okay with it. I am still so excited and pleased with how it turned out! Also very happy that the yellow really contrasts with the white unlike the regular yellow Sharpie.
What do you think? Would you try this? If you do, let me know how it goes!
Thank you to Emily at Scribbles from Emily for the tutorial!
As you saw in my post earlier today, I did buy the pack for my students and I am excited about the cute mugs they will create for their reading teachers!
I've linked up at the following parties:











I LOVE it! Your mug is super cute! Great job!
ReplyDeleteSuper cute! Great details and info.
ReplyDelete<3
This is amazing!!!!!
ReplyDeleteI would love if you link this to my Link party on Monday!
XOXO
Isabelle
http://lechateaudesfleurs.blogspot.com
Cool! I have those markers and I'm going to try this!
ReplyDeletewww.domesticblisssquared.com
I'd love to see/hear how it goes for you!
DeleteDefinitely going to look for those markers! Thanks for the tips :o)
ReplyDeleteI know that both JoAnn's and Michael's carries them, probably Hobby Lobby as well. And I just saw the 5pack at a non-craft store the other day, cannot remember which one but I was in both WalMart and Target recently so must have been one of those!
Deleteinteresting! oil based sharpies. i can't wait to try
ReplyDeleteI know! I'm excited for even MORE projects using them. :)
DeleteWhat a fun idea! I've been wanting to try this but I can't find (cheap) White Mugs. I'll have to check the Dollar Store. TFS!
ReplyDeleteI visiting from Monday Funday. I hope you can stop by my blog and leave a comment and Link Up!
~ Megin of VMG206
www.vmg206.blogspot.com
That is so awesome! Thanks for the tip about using *paint* markers! :)
ReplyDeleteSo glad to hear about a way to DIY mugs! This is great. I would love for you to come and share this at our linky party.
ReplyDeletehttp://www.huckleberrylove.com/2013/03/much-ado-about-monday-no-2-and-features.html
Hope to see you there,
Jamie
www.huckleberrylove.com
My daughter made this in a class she took. I was curious about how the Sharpies worked on it. I was thinking about letting the rest of my kids try it out so they each had their own personalized mug.
ReplyDeleteOh, and I'm visiting from Titus 2sday. Thanks for sharing!
What a great tutorial. I have seen these sharpie mugs around too. Glad I stumbled on yours (if I ever made one). Love the chevron too. I am hosting a link party and would love it if you would share this. I think it is very informative.
ReplyDeletehttp://www.ifitsnotbaroquedesignblog.blogspot.com/2013/03/tuesday-link-party-12.html
Super cute! Visiting from the Craft-o-Maniac link party.
ReplyDeleteDirtroaddamsel.blogspot.com :)
Wow, it turned out beautiful! Fun gift idea. Thanks for linking this up to Monday Funday!
ReplyDeleteThis is amazing!! I love how the chevron looks and yellow is great!
ReplyDeleteSuper cute and a great teacher gift! Thanks for linking up at Much Ado About Monday!
ReplyDeletesuper duper cute! thanks for the comparison - makes me want to run out for a marker and a cheapo cup to play!
ReplyDeletei actually really like the "fuzzy" edges, i feel like we're seeing a lot with the more ikat-ish flair to it.
ReplyDeleteThis gorgeous DIY Chevron Mug (which is my favorite color, yellow!) is being Featured today on Huckleberry Love! Thanks so much for linking up with us at Much Ado About Monday. Stop on by to grab your "I Was Featured" Button and display it proudly! Have a great weekend and we hope to see you back on Monday. :)
ReplyDelete~Emily
www.huckleberrylove.com
This is by far THE coolest Sharpie/mug project I've seen. I, too, had read very mixed reviews about the final results using the regular Sharpie. Now that I've seen this, I plan to pick up a few of the oil-based Sharpies next time I'm at JoAnn's. Thanks for sharing!
ReplyDeleteReally cool - I have been wanting to try this and am very grateful for your experience and tips!
ReplyDeleteThanks for linking up this week!
Stacey of Embracing Change
I am featuring your chevron mug today on my blog. Thanks for linking it up. The next party starts later today. I hope that you will link up again.
ReplyDeletehttp://www.ifitsnotbaroquedesignblog.blogspot.com/
Thank you for the info. It sounds pretty user friendly. I guess I’ll pick one up for fun. thank u
ReplyDeleteSharpie Paint Markers
Fabulous idea to make a personalized mug for any occasion. Thanks for sharing.
ReplyDeleteAnd the oil based paint is still safe to use with food /drink? That would be my concern. Any thoughts on that?
ReplyDeleteI just did this, used oil-based sharpies, let it dry for 24 hours, then baked in oven as you described, used it, washed in dishwasher last night and used it again this morning. It looks fabulous and I am so excited to do more!
ReplyDelete